|
���xAdobe Photoshop�����Q��PS��������Adobe Systems�_�l�Ͱl�еĈD��̎��ܛ����Photoshop��Ҫ̎�������������ɵĔ��ֈD��ʹ���䱊��ľ����c�L�D���ߣ�������Ч���M�ЈDƬ... Adobe Photoshop�����Q��PS��������Adobe Systems�_�l�Ͱl�еĈD��̎��ܛ����Photoshop��Ҫ̎�������������ɵĔ��ֈD��ʹ���䱊��ľ����c�L�D���ߣ�������Ч���M�ЈDƬ��������ps�кܶ�ܣ��ڈD�D�Ρ����֡�ҕ�l������ȸ����涼���漰�� ���龎�a�ߣ��������A��ƫ���ġ��҂����ԅ���һЩ����ľW�PS�̳̣�����������OӋ����������һ��Ԓ�������x��Ԋ�����ף�������ԊҲ����������ϵ�еĽ̳́�Դ�ھW�ϵ�PS�̳̣����LJ���ģ�ȫӢ�ĵġ����ˇLԇ���g�@Щ����Ľ̡̳���鷭�g�������ޣ����g�ļ�����߀�д����ã�ϣ���V��W�Ѳ����n�̡� �s���� 1�����ĵ�ܛ����Photoshop CS5�汾 2��ԭ�̵̳Ľ؈D��Ӣ�ĵģ����������������Ļ��A�ϣ����½������İ�ĈD 3��ԭ������Щ�����]�нo�������������ڷ��͜yԇ����r�y����һЩ�������Լtɫ�������@ʾ����Щ�e�`�ą�����ֱ���Լtɫ�����@ʾ���_�ą��� ���磺��90��22��231��77������ʾ���ε����Ͻǵ������ǣ�90��22������231����77 ���磺��90��22������ʾ���ε����Ͻǵ������ǣ�90��22�������ε������ɂ������̳����ѽ�ָ�� 4���ڽ̵̳��������ϱ��˵��ĵá���Щ�nj��̳��е�һЩ���E�ă����ȡ�
In this week��s tutorial we will create a gallery layout. I will not be using the 960 grid in this tutorial, the purpose is to show beginners out there how important the Ruler Tool is when you are designing in Photoshop. We will also tackle how to create and use patterns and using mask and filters. ���@��ÿ�̳ܽ��У��҂�Ҫ����һ�����ȵľW퓲��֡��Ҍ��ڱ��̳��в�ʹ��960�W��ϵ�y��Ŀ���ǽo���W��չʾ�˳߹�����PS���_ʼ�OӋ�W��Ƕ�ô��Ҫ���҂�Ҳ����ʾ��΄���ʹ�ÈD����ʹ���ɰ�͞V�R
Step 1: Setting up the Document ���E1���O���ęn
Start by creating a 1200px x 1850px document in Photoshop. �_ʼ����PS���½��ęn���ߴ磺1200px*1850px
As I mentioned earlier we will be using the Ruler Tool. Make sure that rulers and guides is turned on. ���焂�����f���҂�Ҫʹ���˳߹������_���˳ߺͅ��������Ǵ��_��
Also one thing important in using Ruler Tool is the Info(Information) Panel. The use of this is when you are measuring using the ruler the information will be shown in the information panel. Make sure that this is shown in your panels at the right. If it is not shown you can access this by going to Windows �C Info. ������ʹ���˳߹�������Ҫ��һ��������Ϣ�����������;�Ǯ������ڜy���r�����˳���Ϣ�@ʾ����Ϣ����С�Ո�_���@������߅��������@ʾ����������@ʾ��������ͨ�^�c�������� > ��Ϣȥ�@ʾ����
The total width of your site will be 960px. So, let��s create our first guide by going to View �C New Guide, set the value to 120px. Repeat the step of create a guide but now change the value to 1080px, this will make a total of 960px in the center of our canvas. ��ľW퓵Ŀ����ȕ���960px�����ԣ��҂������҂���һ�l���������c����ҕ�D > �½����������O��ֵ��120px���؏Ͳ��E����һ�l�����������^��ֵ�Ğ�1080px���@��ʹ��Į��������g����һ����960px����
Step 2: Creating the Header ���E2�������^���^��
TheHeader section is composed of Logo, Navigation, and Search. First thing you need to do is to create a folder name it Header and inside of it create sub folders and name them Logo, Navigation, and Search. It is important that you group all the things you do properly in order to be organized and easily locate things in the future for coding purposes. �^���^�����LOGO�������ڡ������ڡ���Ҫ����������Ҫ����һ������Header���ļ��A���������Є�������Logo��Navigation��Search�����ļ��A���Ѹ�헷ֽM�Ƿdz���Ҫ�ģ��Ա����_�ĽM��Ԫ�غ͌������a�ĕr�������λԪ�ء�
Inside Header folder create a new layer and name it bg. Using Rectangle Tool create a 100% x 100px. By looking at the Info Panel you can view the dimension of the shape that you��re making. Or you can do this by creating a new guide by going to View �C New Guide �C 100px Horizontal. It��s up to you what way you choose. ��Header�ļ��A���½�bg�D�ӡ������ι�������100%*100px�ľ��Ρ��鿴��Ϣ����r������Կ�Ҋ�ㄓ�����Π�ijߴ硣����������½�һ�l������������@���£��c����ҕ�D > �½��������������O�Þ飺ˮƽ100px���@ȡ�Q������ʲô��������ɡ�
Add this Blending Option �������µĻ���x�
Next thing you do is create two lines using Line Tool 55px distance from the top. But I suggest to use Rectangular Marquee Tool to make the line pixel perfect. ����������Ҫ��ֱ�����������ɗlֱ������0��55��1200��1������0��56��1200��1���������x픲�55px�����^�ҽ��h��ʹ�������x��ֱ������������
As you can see in the preview of our header there is a pattern above the lines. Create a new document 9px x 7px, background content Transparent. Using Pencil Tool with a fill color of #cfcfcf create a pattern as shown in the screenshot below. When you are done go to Edit �C Define Pattern and name it whatever you wish to call it. �����㿴�����҂��^���^����A�[���ǃ���һ���D����ֱ�����Ϸ����������ęn���ߴ磺9px*7px�����������ġ����U�P������������Ľ؈D�����D�������ɫ�� #cfcfcf��������ɺ��c������ > ���x�D����ȡ������ȡ�����֡�
Using Paint Bucket Tool instead of foreground change it to pattern and select the pattern we made. Apply this pattern by making a selection and fill with pattern using Paint Bucket Tool. �x������Ͱ������������������Q���҂�֮ǰ�����ĈD��������һ���x�^��������Ͱ�������D����������ӈD���Ĺ����� ���h�����ι�������һ�����Σ�0��48��1200��7��������0���������µĈD���B�ӵĈD�Ә�ʽ
Step 3: Creating Logo ���E3������LOGO
This is just a simple site name logo. Start by using Text Tool and type your desired site name. �@�H�H�Ǻ��εľWվ����LOGO�������ֹ�����ݔ���������ľWվ������ ���w��Helvetica BOLD����̖��30px��TEMPLATE���ɫ�� #494367��SHOW���ɫ�� #A5AB0D
Add this Blending Option �������µĻ���x�
Step 4: Creating Navigation ���E4�����������ˆ�
Again using Text Tool lets place our navigation links. �ٴ������ֹ����[���҂��Č���朽� ���w��Helvetica BOLD����̖��16px��About���ɫ�� #252525���������ֵ��ɫ�� #555555
Add this Blending Option �������µĻ���x�
Step 5: Creating Search ���E5������������
To create our search bar use Rounded Rectangle Tool and set the radius to 10px, then create a shape as shown in the screenshot below. ���A�Ǿ��ι��������҂��������ڣ��O�ð돽��10px��Ȼ��������Ľ؈D����һ���A�Ǿ��Σ�65��805��275��70�� ���h���½��ėl����������ֱ780����ֱ805��ˮƽ65��ˮƽ100
As you can see in the preview above, the left side of our search bar is slanting. So, we need to transform our shape by selecting the layer and press Ctrl + T then Right Click to the work area and select Distort. ������Ҋ���A�[�D�У��҂��������е���߅��б�ġ����ԣ��҂�Ҫ׃�Q�҂����Π�x�t�D�Ӳ���Ctrl + T��Ȼ���ڹ����^�����I���x��Ť���������D�M��׃�Σ��߶��O��70�Ǻ��m�ģ�ֻҪ����׃��325px����߅�����ô��^���c��
Next we need to mask the bottom part of our shape to be equal in our header. First set the foreground to #000000, then select the layer bg in our header and make a selection of it. While it is selected select the shape of our search the press the Mask Icon in the layers panel area beside the fx icon. Just refer to the screenshot below. ��һ�����҂���Ҫ���ֵ��҂����Π�ĵײ���ʹ������҂����^���^�������O��ǰ��ɫ�� #000000��Ȼ�����҂����^���^���bg�D������һ���x�^���������x�У��x���҂������ڵ��ΠȻ���ڈD������Ѕ^fx�D�ˣ����ӈD�Ә�ʽ�D�ˣ���߅���ɰ�D�ˡ���������Ľ؈D��
Add this Blending Option �������µĻ���x�
Now let��s create the search button. Make a selection of the search bar, contract it by 2px, and fill it with any color. To contract go to Select �C Modify �C Contract. �F���҂����������ڰ��o�����������ڵ��x�^���տs2px��Ȼ���������ɫ��䣨�½��D�ӣ�Ȼ��������Ͱ��������ɫ����ͨ�^�c�����x�� > �� > �տs���տs�x�^ ���h������һ���������տs2px
Select Rectangular Marquee Tool, by pressing Alt key you will notice that there is a - sign beside the selection pointer, this sign means to deselect selection. Now you can deselect the section you want to deselect. �x�������x������סAlt�I�������ע����x����һ����һ���p̖���@���p̖��ζ��ȥ���x�^���F�������ȥ������ȥ�����x�^
Add this Blending Option �������µĻ���x�
Open up the search icon, align it and add a 1px drop shadow #ffffff. ���_search�D�ˣ����R�[�Ų�����1px��ɫ��ͶӰ
���D�����Լ����ɫ����ˣ��ٽo�D�������ɫ�B�ӣ� #c2c2c2����ʹ�L��yһ
�ٽo�������������֣�search for something..�����w��Arial б�w����̖��14px���ɫ�� #666666
Step 6: Creating Slider ���E6�������DƬ���ә�
Create a folder above Header folder and name it Slider. Using Rectangle Tool with a fill color of #413f6b create a 100% by 250px. ��Header�ļ��A���½�Slider�ļ��A�������ι�������һ����100%��250px�ľ�����0��99��1200��250��������ɫ�� #413f6b
Add this Blending Option �������µĻ���x�
Convert the shape layer to Smart Filters by going to Filter �C Convert for Smart Filters. Now, go to filter again and add noise ͨ�^�c�����V�R > �D�Q�����ܞV�R��ԓ�Π�D���D�Q�����܌��F�ڣ��ٴ��c�����V�R > �����sɫ
Controls ���ư��o
Create a folder inside Slider and name it Controls. Controls should have sub folders named: NextPrev and Slider Control. Inside NextPrev let��s create our Next and Previous buttons start by selecting Ellipse Tool with a fill color of #676589 and create a shape 40px x 40px. ��Slider�M������Controls�ļ��A��Controls�Ѓɂ����ļ��A��NextPrev��Slider Control����NextPrev�У��҂����E�A���������҂���Next��Previous���o���ɫ��䣺 #676589���Π�ߴ磺40px * 40px����120��204��40��40��
Download the arrow icon provided in the resources and place it on our canvas. Resize and position it as shown in the screenshot below. ���d�YԴ���ṩ�ļ��^�D�˲����������҂��Į����ϡ��{����С����������Ľ؈D�[��
We are going to mask the shape, first set the foreground color to #000000, next make a selection of the arrow icon by Ctrl + Click to the layer and Inverse the selection by pressing Ctrl + Shift + I. While it is selected select the Ellipse shape and press the Mask Icon beside the fx icon in the layers panel. �҂�����o�Π��������֣������O��ǰ��ɫ�� #000000������ͨ�^�ڈD���ϰ�Ctrl + Click�������^���x�^������Ctrl + Shift + I���D�x�^�������F�x�^�r���x��E�A�Π�D��Ȼ���ڈD������Ѕ^fx�D�ˣ����ӈD�Ә�ʽ�D�ˣ���߅���ɰ�D�ˡ�Ȼ��Ѽ��^�D���[�ء�
Duplicate the shape and place it on the other side. Grab some sample images to put in our slide. Also, using Text Tool add some text: a sample title and a little content just follow the formatting of the text as shown in the screenshot below. ����ԓ�Π�[�ŵ���һ߅��1040��204��40��40�����@ȡһЩʾ���DƬ�����҂��ĈDƬ���ә��ϡ����������ֹ�������һЩ�ı�����������؈D�ϵ��ı���ʽ��һ��ʾ�����}��һЩ�������֡�
���}���w��Helvetica BOLD����̖��22px���ɫ�� #ffffff�� �������w��Arial����̖��12px���ɫ�� #E0DEFF���Sɫ��more���ɫ�� #EAEC25
Now we are going to work on our Slider Controls. Using Rounded Rectangle Tool with a 10px radius create a shape as shown in the screenshot below. Transform the shape the same as we did in our Search bar. �F���҂����ㄓ���҂��Ļ��әڵČ������o�����A�Ǿ��ι������O�ð돽��10px�������D����һ���A�Ǿ��Ρ����֮ǰ��������һ���M��׃�Q
Also mask the layer as we did previously, refer to Step: 5 Creating Search. �o�@���D�������ɰ棬����֮ǰ���ģ��鿴���E5������������ �@�����E���^ʡ�ԣ�������@���a������ �ÈA�Ǿ��ι��ߣ��돽10px������һ���A�Ǿ��Σ�960��324��100��50��
��Ctrl + T����׃�Q�����Π������I�x��Ť������סShift�I�������τ����½ǵĿ��ƉK��ֱ������׃��130���ٰ�סShift�I�����τ����½ǵĿ��ƉK��ֱ������׃��160��
����ɫ�������ϰ�Ctrl + Click���@�þ����x�^��Ȼ���x�мtɫ�Π�ĈD�ӣ����D������ϵ��ɰ水�o
Add this Blending Option �������µĻ���x�
Using Ellipse Tool create a shape as shown in the screenshot below. ���E�A��������������؈D��ʾ���Π���978��333��9��9������996��333��9��9������1014��333��9��9������1032��333��9��9�� ��ɫ���ɫ�� #D4D4D4���Gɫ���ɫ�� #A5AB0D
Add this Blending Option �������µĻ���x�
This will be the result. �@����K����
Using Rectangle Tool with a fill color of #000000 create a 100% by 5px shape, then set the layer mode to multiply and opacity to 30% in the layers panel. �����ι�������һ����100%��5px�ľ�����0��344��1200��5�������ɫ�� #000000��Ȼ���ڈD��������O�ÈD��ģʽ����Ƭ�B�ף�������30%
Make a selection of the slider control shape and expand it by 5px by going to Select �C Modify �C Expand. �������әڌ����K���x�^����ͨ�^�c�����x�� > �� > �Uչ���Uչ�xȡ5px�� �½��D�ӣ�������Border���ú�ɫ��䣬�D��ģʽ�Ğ���Ƭ�B�ף������ȸĞ�30%
�x����ɫ�����D�ӣ���Ctrl + Click�����x�^��Ȼ���x��Border�D�ӣ��c��D������ϵ��ɰ水�o
�����Ѓɂ���ɫɫ�K�������C���^�m�ġ���Border�D�������I�x���D�Q�����܌�����֮ǰ�ęM�l���ΈD���ϰ�Ctrl + Click�����x�^������Ctrl + Shift + I���x�x�^
Ȼ���x��Border�D�ӣ��c��D������ϵ��ɰ水�o
Final step to create our slider is to add highlights. First make a selection of our slider base, then select Brush Tool set the hardness to 0% and size about 400px. Fill the selection in a separate layer with #ffffff color and set the blend mode to Soft Light in the layers panel. ���o�҂��Ļ��ә����Ӹ���Ч�������Ƚo�҂��Ļ��әڄ����x�^��Ȼ���x�����P�������O��Ӳ��0%���ߴ�400px���چΪ��ĈD��������ɫ�� #ffffff��Ȼ���ڈD��������O�û��ģʽ�����
Step 7: Featured Gallery ���E7�����x����
Create a new folder and name it Featured Gallery. Using Rectangle Tool with a fill color of #ededed create a shape 100% by 200px. Also, create two 1px lines, first line color #ffffff will be placed on the top of our shape and the second line color #c2c2c2 will be on the bottom. �����µ��ļ��AFeatured Gallery���þ��ι��߄���һ��������0��349��1200��200������100%����200px���ɫ�� #ededed�����������ɗl1px��ֱ������һ�lֱ���[���ھ��ε�픲���0��349��1200��1�����ɫ�� #ffffff���ڶ��lֱ���[���ھ��εĵײ���0��548��1200��1�����ɫ�� #c2c2c2��
���Կ������ڻ��әڵĿ��ƉK�ĵײ��Зl�����ڿ��ƉK�D���ϰ�Ctrl + Click�������x�^����Ctrl + Shift + I�����x�^���x�а�ɫֱ���ĈD�ӣ��c��D������ϵ��ɰ水�o
Create a new layer above the shape and name it highlight. Then, make a selection of the shape. Using Brush Tool with a fill color of #ffffff brush in the center of the selection then, set the layer mode to Soft Light. ���Π�ĈD�����½��D��highlight��Ȼ�����Π���x�^�������P�������x�^����������ɫ�����O�ÈD�ӵĻ��ģʽ�����
Now let��s work on our sample post for our featured gallery. First, create a folder named post then put a 100px x 100px sample thumbnail on our canvas. Also, Using Text Tool add a Title and Content. �F���҂��������x�����е�ʾ���б������ȣ�����һ���ļ��Apost��Ȼ�����҂������ϔ[��һ��100px*100px��ʾ���s�ԈD�������ֹ�������һ�����}�̓��� ���}���w��Arial����̖��16px���ɫ�� #363636���������w��Arial����̖��12px���ɫ�� #636363
Create a new layer below the thumbnail and name it shadow, using Pen Tool create a shape as shown in the screenshot below. Then, go to Filter �C Blur �C Gaussian Blur 1px, and set the Opacity to 50% in the layers panel. �ڿs�ԈD�����愓��һ���µĈD��shadow����䓹P���߰��ս؈D�����ΠȻ���c�����V�R > ģ�� > ��˹ģ������λ1px�����ڈD��������O�ò����Ȟ�50%
Create a new folder and name it rate. Now, open up the star icon and place it to our canvas and place it as shown in the screenshot below. �����µ��ļ��Arate���F�ڣ����_star�D�˲���������؈D�[�ŵ��҂��Į�����
Add this Blending Option �������µĻ���x�
Make a selection of the star and deselect starting from the middle to bottom and in a separate layer fill it with Linear Gradient #ffffff to Transparent then, set the Opacity to 70% in the layers panel. �ostar�D�ӄ����x�^��ȥ��star���g���ײ����x�^���چΪ���һ���D�����þ��ԝu׃��䣬��#ffffff�������ڈD��������O�ò����Ȟ�70%
This will be the result. �@�ǽY��
Duplicate the star four times. ����star�Ĵ�
Duplicate the post folder two times a position it as shown in the screenshot below. ����post�ļ��A�ɴβ���������Ľ؈D�[��
Step 8: Posts ���E8���б�
Fill the Background layer with #ededed. Create a new folder and name it Body Posts, create a sub folder and name it post. Now, create a sample 300px by 200px image thumbnail for our post and place it in our canvas. Using Rectangle Tool create a 300px by 45px shape just fill it with any color. Just refer to the screenshot below. ��䱳���D�ӣ��ɫ�� #ededed���������ļ��ABody Posts������һ�����ļ��Apost���F�ڣ�����һ���҂��б���300px*200px�Ŀs�ԈD���҂��Į����ϡ������ι�������һ��300px*45px�ľ��Σ�������ɫ��䡣��������Ľ؈D
Add this Blending Option �������µĻ���x�
Duplicate rate folder from our featured gallery and place it in the post folder. Also, using Text Tool create a sample title, just follow the settings in the screenshot below. ��featured gallery����rote�ļ��A���u�r�ǣ���post�ļ��A�����[�ŵ����mλ�á����ң������ֹ�������һ��ʾ�����}����������Ľ؈D�O�� ���}���֣����w��Helvetica����̖��16px���ɫ�� #363636
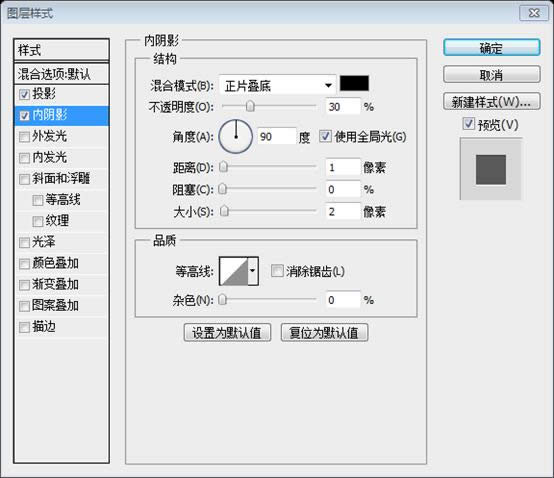
For unrated star style just remove the Gradient Overlay and replace it with Inner Shadow. �]�И�ʾ�����ǵĘ�ʽ��ȥ���u׃�B�ӣ�Ȼ����Q����Ӱ��߀��ȥ��ͶӰ����߅�����Ӱ�ɫ���ɫ�B����
Duplicate post folder five times and align it as shown in the screenshot below. ����post�ļ��A��Σ�����������Ľ؈D�[�ţ�ˮƽ�g��20px����ֱ�g��19px
Step 9: Pagination ���E9����퓰��o
Select Rounded Rectangle Tool and set the radius to 5px then, create a 620px by 45px shape below those posts. �x���A�Ǿ��ι������돽5px������һ��620px*45px�ĈA�Ǿ�����120��1403��620��45�����б������棬�ɫ�� #fffcfd
Add this Blending Option �������µĻ���x�
Using Text Tool place the number of pages as shown in the screenshot below. �����ֹ�����������Ľ؈D����퓴a �������w��Verdana����̖��12px��퓴a���ֵ��ɫ�� #7E7E7E��퓴a1���ɫ�� #363636��Last���ɫ�� #7266FE
Step 10: Sidebar ���E10����߅��
Create a #c2c2c2 1px line 40px distance from our post, Mask the line and make the tip faded using Brush Tool with a fill color of #000000. You may have something that looks like the screenshot below. ���x�҂����б�40px����һ�lֱ����780��549��1��300�����ɫ�� #c2c2c2���oֱ�������ɰ棬����һ��������Ч���������P����������ɫ�� #000000�������Ė|����������Ľ؈Dһ�� ����������Ч�������h�ã��c�����D�� > ʸ���ɰ� > �@ʾȫ����Ȼ�����¶������u׃������䣬�ĺ�ɫ����
Duplicate the line and move it to the left and change the color to #ffffff. Create a Horizontal line with the same color place it as shown in the screenshot below. �����@�lֱ�����Ƅӵ���߅�������ɫ�� #ffffff����ͬ�ӵ��ɫ����һ�lˮƽֱ������������Ľ؈D�[�š�
Next, create a new layer below those lines we have just created and name it shadow. Using Selection, Gradient Tool, and Eraser Tool perform what you have seen in the screenshot below. The set the shadow layer to Multiply, Opacity to 50%. ���������@Щֱ�������½��D��shadow�����x�^�������u׃����������Ƥ���������ʹ�ã������㿴���Ľ؈Dһ�ӡ��O��shadow�D�Ӟ���Ƭ�B�ף������Ȟ�50%
Duplicate the layer and place it on the top as shown in the screenshot below. It��s up to you to make adjustments, just erase the portion that you don��t like. ����ԓ�D�Ӳ���������Ľ؈D�[�ŵ�픲����@ȡ�Q������{���������㲻ϲ�g�IJ��� ���h�½��x�^��Ȼ�����u׃����ˮƽ�ʹ�ֱ�������һ�£�Ȼ�����Ӻ��Qֱֱ��һ�ӵ��ɰ�
Select Rounded Rectangle Tool then set the radius to 10px. Create a shape as shown in the screenshot below. The width of the shape is the remaining width of our canvas and the height will be 40px. �x���A�Ǿ��ι������O�ð돽��10px�������D����һ���Π���760��597��320��40�����Π�Č������҂�����ʣ�µČ��ȣ��߶�40px �������x��������һ���x�^��780��500��350��200����Ȼ�����x����εĈD�ӣ��c��D������ϵ��ɰ水�o
Add this Blending Option �������µĻ���x�
Using Text Tool add a header title. �����ֹ�������һ�����}�����w��Helvetica����̖��24px���ɫ�� #ffffff��������ͶӰ��ʽ
Next open up the social icons and place them on our canvas, align them as shown in the screenshot below, and also add their corresponding social icon names using Text Tool. �������_���ý�w�D�˲��������[�ŵ��҂��Į�������������Ľ؈D�[�ţ��������ֹ����oÿ���D�����ӌ������f�����֡����w��Helvetica����̖��16px���ɫ�� #363636
Create two new folders and name them: Categories and Our Partners. Using Text Tool and Line Tool perform what you can see on the screenshot below. �����ɂ��µ��ļ��A��Categories��Our Partners�������ֹ�����ֱ���������ʹ�ã���������Ľ؈Dһ�� ���}�����w��Helvetica����̖��18px����߅���ֵ��ɫ�� #363636����߅���ֵ��ɫ�� #655DF3 �б������w��Tohoma����̖��12px���ɫ�� #7266FE �ָ��������ɫ�� #C2C2C3��������ɫ�� #FFFFFF
Step 11: Footer ���E11����_
Create a new folder and name it Footer. Inside footer there are sub folders named: About, Most Love, and Site Links. Using Rectangle Tool with a fill color of #413f6b create a footer that is the right size to you. �½��ļ��AFooter����Footer�ļ������@Щ���ļ��A��About��Most Love��Site Links�������ι�������һ�����m��_�ľ��Σ�0��1498��1200��352�����ɫ�� #413f6b
Add this Blending Option �������µĻ���x�
Convert the shape layer to Smart Filters by going to Filter �C Convert for Smart Filters, go to filter again and add noise. ͨ�^�c�����V�R > �D�Q�����ܞV�R���D�Qԓ�Π�����܌����ٴ��c���V�R�������sɫ
������һ�l��ɫ��ˮƽֱ����0��1501��1200��1�����������O�Þ�20%
We were going to add info text in our about folder. Using Text Tool put in some dummy text and for the formatting of the text just refer to the screenshot below. �҂�Ҫ��about�ļ��A������һЩ��Ϣ���֡������ֹ�������һЩ���֣�����������Ľ؈D�O�����ֵĸ�ʽ ���}�����w��Helvetica����̖��18px��About���ɫ�� #FFFFFF����߅���ֵ��ɫ�� #ECED2B ���估�����Ϣ���֣����w��Helvetica����̖��12px�������ɫ�� #E0DEFF
Using Text Tool add links on Site Links folder. �����ֹ�����Site Links�ļ��A�������� ���}�����w��Helvetica����̖��18px��Site���ɫ�� #FFFFFF����߅���ֵ��ɫ�� #ECED2B �б����֣����w��Helvetica����̖��12px�������ɫ�� #E0DEFF �ָ�������ֱ���ɫ�� #2F2A47������ֱ�����ɫ�� #5C5A89
Using Text Tool add a Post Title, Love this, and comments. Create also a 50px x 50px thumbnail and place it as shown in the screenshot below. �����ֹ��������б���}��Love this��comments������50*50�Ŀs�ԈD����������Ľ؈D�[�� ���}�����w��Helvetica����̖��18px��Most���ɫ�� #FFFFFF����߅���ֵ��ɫ�� #ECED2B �б���}�����w��Arial����̖��14px���ɫ�� #FFFFFF �����С���֣����w��Arial����̖��11px���ɫ�� #ECED2B��#E0DEFF �ָ�������ֱ���ɫ�� #2F2A47������ֱ�����ɫ�� #5C5A89
Final steps are adding copyright and back to top button. Open up the arrow icon and rotate it facing top. ��KҪ���Ӱ����Ϣ�ͻص�픲����o�����_arrow�D�˲����D��ʹ֮���^����
Add this Blending Option �������µĻ���x�
Finally we��re done! ��K�҂������
��ӛ�� �@��һƪ�ܺõĽ̡̳��������\�����ɰ�ļ��g�����w��ɫ�������C�����p�Đ�Ŀ�� �ھW�ϲ�醵��@ƪ�̵̳ĕr��ֻʣ�������f���͟oЧ����朽ӡ����x�@���Wվ WayBack Marchine ʹ�Ҳ鵽���@ƪ�̵̳Ă�ݣ������������ɱ��̵̳ķ��g�� ͬ�r���ٽ�Bһ���Wվ TinEYE ���ܸ������ς��ĈDƬ�Ҍ���ƵĈDƬ���¹���߀������������ָ���ɫ�ı������Ҍ����P�ĈDƬ�� �D�����Ұѽ̳��е��ۼ��ς����ҵ���PSD�زģ��ܺú���
����PS�W��OӋ�̳�XXIX���������PS���OӋһ�����Ȳ��� ���P����Ո�PעPHP���ľW�� PhotoshopĬ�J������ļ���ʽ�����Ա��������ЈD�ӡ�ɫ�桢ͨ�����ɰ桢·����δ�Ÿ������Լ��D�Ә�ʽ�ȡ� |
��ܰ��ʾ��ϲ�g��վ��Ԓ��Ո�ղ�һ�±�վ��
��վ�l����Win7������ϵ�y��Win10�������XP������ϵ�y�H�邀�ˌW���yԇʹ�ã�Ո�����d��24С�r�Ȅh�������������κ��̘I��;����t�����ؓ��Ո֧��ُ�Iܛ����ܛ����
��վ�����YԴȫ�������ھW�j�YԴ,���ַ������ę���,Ո���r֪ͨ�҂�(peng896066052@126.com),�҂������r̎��.
Copyright © 2018-2020 ����ľ�L���dվ